
OVH panel offers easy Raid configuration for the partitions in up to 2 drives. Recently I was working on a server that has 2 SSDs and 2 HDDs. The server is intended to serve as a Shared Hosting server. My idea was to install the OS on the SSDs and use the HDDs for hosting website data. It was not much of a hassle to install the OS on SSds on Raid1. I can easily add the two HDDs as additional drives and mount them both to be used for storage. But there’s a drawback in such configuration. There will be no redundancy for the storage drives. If any of those HDDs crash – I will lose all data on it. So, my idea is to create another Raid1 with the two HDDs. Unfortunately, it is not possible from the OVH panel and OVH denied any support on this issue. Therefore I had to do it myself.
Since many of the server providers are offering servers with 4 drives – I believe some of you might find this useful. The idea is to create two Raid arrays of 4 drives. In this case – the two SSDs were already in Raid 1 – configured by the OVH panel. So what I needed to do is to create another Raid 1 with the other two HDDs.
Here is how the initial configuration looked like:
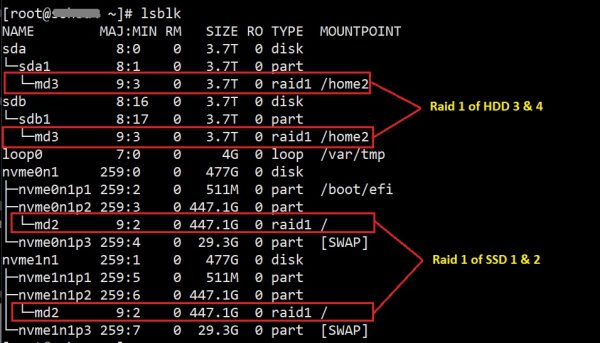
#lsblk
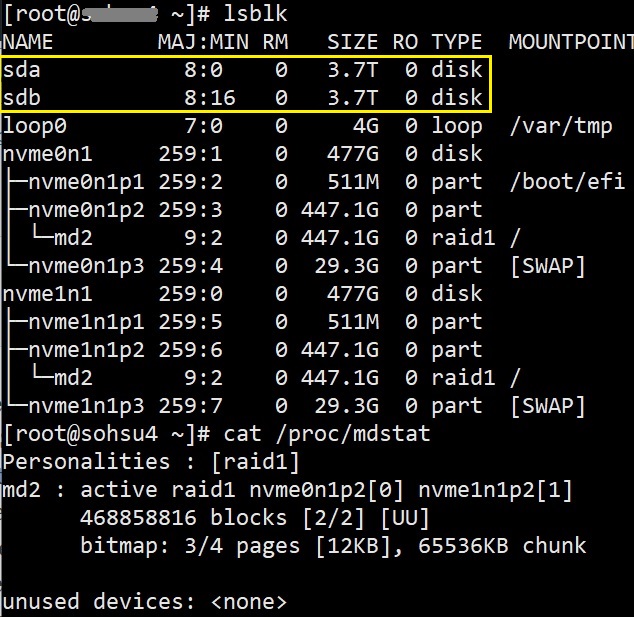
There already is a Raid1 between the second partitions of the two SSDs (nvme0n1p2 & nvme1n1p2). The two HDDs are “sda” & “sdb” which are unformatted and no partitions are created.
The basic steps are as follows:
- Create a partition in sda with full volume
- Create a partition in sdb with full volume
- Create a Raid1 with the two partitions from sda & sdb
- Set the file system (ext4) for the newly created Raid1
- Mount the newly created Raid1 to be used as the new volume in the server.
IMPORTANT NOTES:
To check the current Raid configuration:
#cat /proc/mdstat
To create a new partition in a drive:
# fdisk /dev/sd[x]
fdisk can create partitions with max 2TB. Here in my case the two HDDs were of 4TB each. Therefore I had to use GPT parted to create the partition. If you want to learn more about GPT click here.
1. Create a partition in sda with full volume:
# parted /dev/sda
Output:
GNU Parted 2.3
Using /dev/sda
Welcome to GNU Parted! Type ‘help’ to view a list of commands.
(parted)
Creates a new GPT disklabel i.e. partition table:
#(parted) mklabel gpt
Sample outputs:
Warning: The existing disk label on /dev/sda will be destroyed and all data on this disk will be lost. Do you want to continue?
Yes/No? yes
(parted)
Next, set the default unit to TB, enter:
#(parted) unit TB
To create a 3.7TB partition size, enter:
#(parted) mkpart primary 0 0
OR
#(parted) mkpart primary 0.00TB 3.70TB
To print the current partitions, enter:
#(parted) print
Sample outputs:
Model: ATA ST33000651AS (scsi)
Disk /dev/sda: 3.70TB
Sector size (logical/physical): 512B/512B
Partition Table: gpt
Number Start End Size File system Name Flags
1 0.00TB 4.00TB 4.00TB ext4 primary
Quit and save the changes, enter:
#(parted) quit
Sample outputs:
Information: You may need to update /etc/fstab. (Since we will be creating Raid with this partition – not need to add this in /etc/fstab in this case)
Use the mkfs.ext3 or mkfs.ext4 (ext4 preferred) command to format the file system, enter:
# mkfs.ext3 /dev/sda1
OR
# mkfs.ext4 /dev/sda1
2. Create a partition in sdb with full volume
# parted /dev/sdb
#(parted) mklabel gpt
Warning: The existing disk label on /dev/sdb will be destroyed and all data on this disk will be lost. Do you want to continue?
Yes/No? yes
(parted)
Next, set the default unit to TB, enter:
#(parted) unit TB
To create a 3.7TB partition size, enter:
#(parted) mkpart primary 0 0
OR
#(parted) mkpart primary 0.00TB 3.70TB
To print the current partitions, enter:
#(parted) print
Sample outputs:
Model: SATA ST33000651AS (scsi)
Disk /dev/sdb: 3.70TB
Sector size (logical/physical): 512B/512B
Partition Table: gpt
Number Start End Size File system Name Flags
1 0.00TB 4.00TB 4.00TB ext4 primary
Quit and save the changes, enter:
#(parted) quit
Sample outputs:
Information: You may need to update /etc/fstab.
Use the mkfs.ext3 or mkfs.ext4 (ext4 preferred) command to format the file system, enter:
# mkfs.ext3 /dev/sdb1
OR
# mkfs.ext4 /dev/sdb1
IMPORTANT NOTE:
BEFORE PROCEEDING TO NEXT STEP CHECK THE FILE SYSTEMS OF THE NEWLY CREATED PARTITIONS OF THE TWO DRIVES:
#fdisk -l
If you see something like the following:
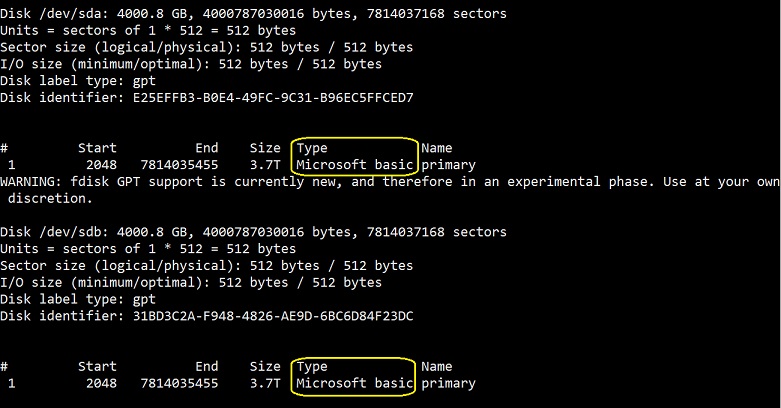
You need to do some extra steps to convert these partitions to ext4. Please check the (#13 reply) THIS LINK for details.
=============================================================
Solution: Install gdisk (yum install gdisk) (Check: https://bbs.archlinux.org/viewtopic.php?id=191163 (check #13 reply))
NEED TO CHANGE THE FILE SYSTEMS (reported by fdisk -l) from Microsoft Basic to “Linux File System” with the above-mentioned solution)
# yum install gdisk
# gdisk /dev/sda 🙁
GPT fdisk (gdisk) version 0.8.10
Partition table scan:
MBR: protective
BSD: not present
APM: not present
GPT: present
Found valid GPT with protective MBR; using GPT.
#Command (? for help): t
#Partition number (1-1): 1
Current type is ‘Microsoft basic data’
Hex code or GUID (L to show codes, Enter = 8300):
Changed type of partition to ‘Linux filesystem’
#Command (? for help): p
#Command (? for help): w
Final checks complete. About to write GPT data. THIS WILL OVERWRITE EXISTING
PARTITIONS!!
Do you want to proceed? (Y/N): Y
OK; writing new GUID partition table (GPT) to /dev/sda.
The operation has completed successfully.
DO THE SAME FOR SDB
=============================================================
3. Create a Raid1 with the two partitions from sda & sdb
We already had a Raid1 of the two partitions from SSD named “md2”. We can find it:
# cat /proc/mdstat
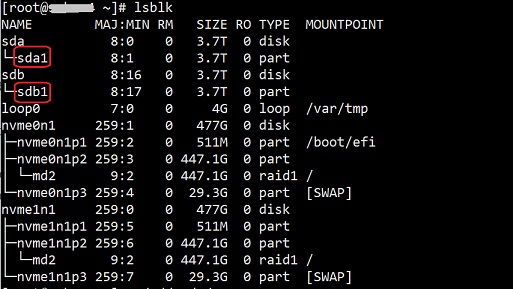
In steps 1 & 2 – we created two new partitions in “sda” & “sdb” named “sda1” & “sdb1” respectively.
Check the Raid status of sda1 & sdb1:
# mdadm –examine /dev/sd[a-b]1
– it will show no raid
NOW run the following to create the Raid1 between sda1 and sdb1:
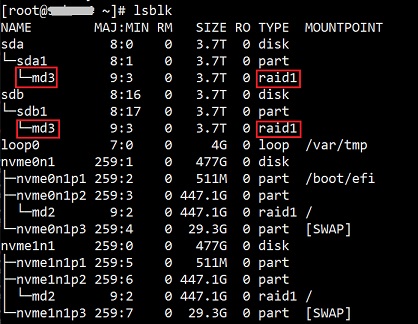
# mdadm –create /dev/md3 –level=mirror –raid-devices=2 /dev/sd[a-b]1
The name of the new Raid1 array is “md3”.
Now check the “lsblk” again and it will show “md3” 3.7TB
Now if you check Raid status ( # cat /proc/mdstat ) you’ll see the Raid partitions sda1 & sdb1 are syncing.
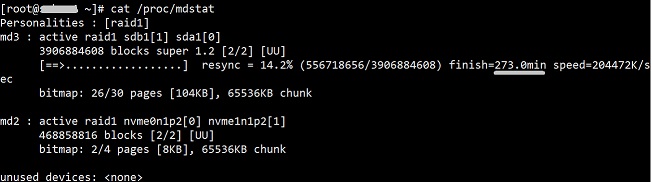
The 4TB disks took almost 5 hours to complete the syncing.
4. Set the file system (ext4) for the newly created Raid1
Execute the following command to set the file system (ext4) of the newly created md3 Raid drive:
# mkfs.ext4 /dev/md3
5. Mount the newly created Raid1
We want to mount the newly created Raid1 (md3) to the directory “/home2”. We need to do the following:
# mkdir /home2
# mount /dev/md3 /home2
Now we need to edit /etc/fstab and add the new Raid volume – so that the storage volume is not lost after the server reboots.
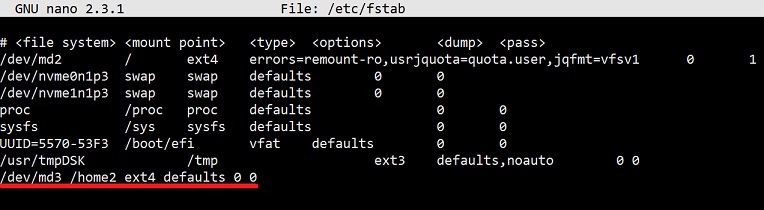
# nano /etc/fstab
add the following line: /dev/md3 /home2 ext4 defaults 0 0
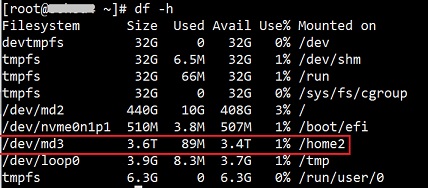
and save the file. That’s it. The new storage volume will remain after server reboot and we can use this to store our data. If we now check the storage details – we will see the following:
The process will be the same for servers from any provider and not only OVH. Feel free to add your suggestion if you think anything can be improved here or if you encounter any problems by following this article. Thank you.